
What Makes the Stardew Valley Iridium Sprinkler Special?
Watering crops by hand gets old fast. Real fast. You start the game all dreamy about quiet farm life, and three days later you’re hunched over a row of parsnips at 6:10 in the morning, can in hand, watching your energy bar drain like a cracked bucket. Then a friend mentions sprinklers, and the whole game opens up.
The top-tier one – that shiny purple beauty that handles a big patch of soil on its own – is the thing every player circles back to. So let’s talk about it properly, without the fluff.
Here’s the short version. The Stardew Valley Iridium Sprinkler waters 24 tilled tiles every single morning, laid out in a 5×5 square with the four corners left dry. Plant your seeds, go to bed, wake up, and the soil’s already damp. No can, no energy spent, no sad shriveled cabbages.
That 24-tile number is the headline. A basic sprinkler hits 4 tiles. A quality one bumps that to 8. The iridium version triples the quality model and does the work of roughly three of them at once. One purple square instead of a cluster – that’s the appeal.
A few ground rules, though. It only waters tilled soil, so an untilled gap in your patch just sits there ignored. It also won’t touch Garden Pots or your pet’s water bowl, and you can’t plant it on sand. Beach farm folks, take note.
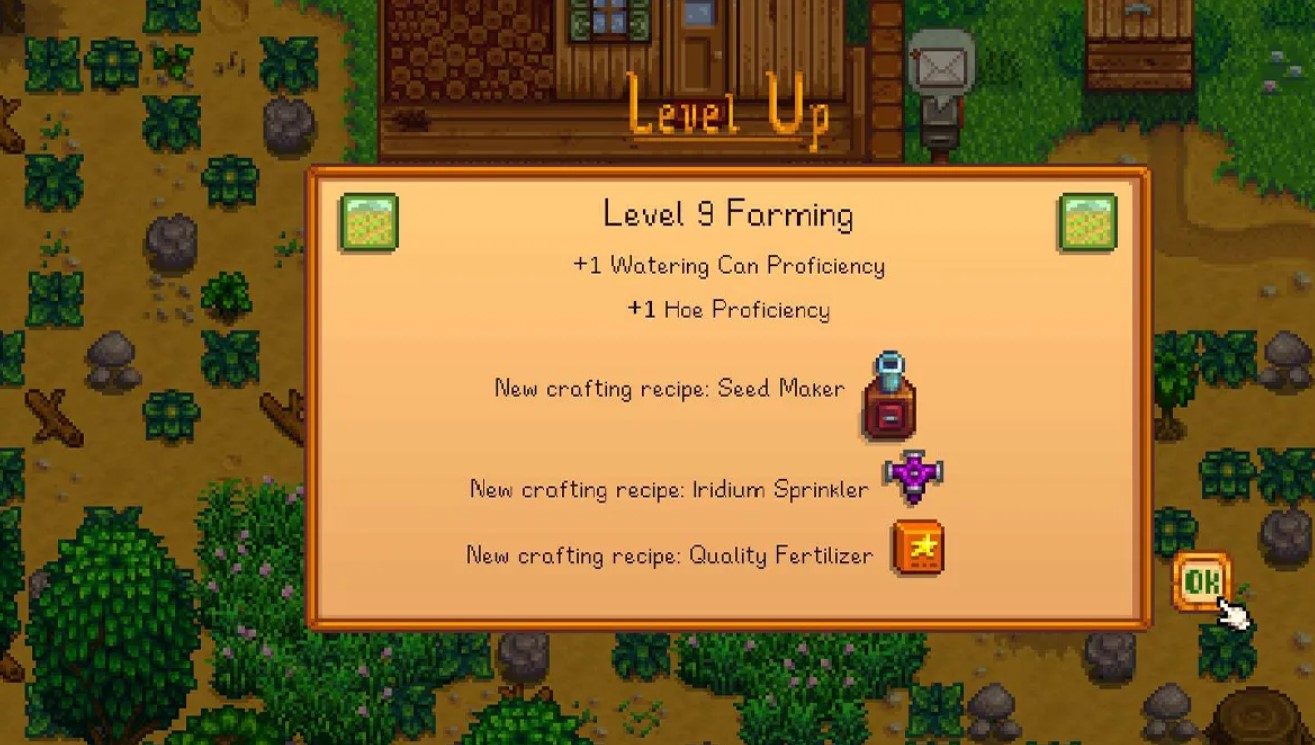
You earn the crafting recipe at Farming level 9, which is deep enough into the skill that you’ve probably already felt the manual-watering grind in your bones. By then, you’re ready. Honestly, that timing feels intentional – Stardew makes you suffer just enough to truly appreciate the upgrade.
One small bonus that nobody talks about: you can drop a Torch right on top of a placed sprinkler for a little light. Handy if your farm corner gets spooky after dark.
Sprinkler Tiers, Side by Side
Before we get into the iridium model itself, it helps to see where it sits in the lineup. Each tier asks for a higher farming level and pricier bars, but the payoff in watered tiles climbs hard.
| Sprinkler | Farming Level | Materials | Tiles Watered | Shape |
|---|---|---|---|---|
| Basic | 2 | 1 Copper Bar, 1 Iron Bar | 4 | Plus (N/S/E/W) |
| Quality | 6 | 1 Iron Bar, 1 Gold Bar, 1 Refined Quartz | 8 | 3×3 |
| Iridium | 9 | 1 Gold Bar, 1 Iridium Bar, 1 Battery Pack | 24 | 5×5 |
Look at that jump from quality to iridium. Eight tiles to twenty-four. That’s not a small step up – it’s the difference between babysitting a dozen little sprinklers and dropping a handful of big ones and walking away. The thing is, the materials get spicy at the top, so most players bridge the early game with quality sprinklers and graduate later. Totally fine. We all did it.
How to Craft Your First Stardew Valley Iridium Sprinkler?
So you’ve hit farming level 9 and the recipe popped. Now comes the shopping list. To build a single Stardew Valley Iridium Sprinkler, you need three things: 1 Gold Bar, 1 Iridium Bar, and 1 Battery Pack. Each one comes from a different corner of the game, which is part of why this thing feels earned.
Let me break down where each piece comes from:
- Gold Bar – smelt 5 Gold Ore with 1 Coal in a furnace. Gold ore shows up in the deeper floors of the regular Mines, roughly the 80 to 120 range. It’s the easy part of the recipe.
- Iridium Bar – smelt 5 Iridium Ore with 1 Coal. This is the bottleneck. Iridium ore mostly lives in the Skull Cavern, and it’s stingy up top. You’ll want to push deep.
- Battery Pack – this one trips people up. It drops from Lightning Rods after a thunderstorm, and you can also pull it from solar panels, a stingray fish pond, or the occasional iridium bat. Stormy days are gold, so plant a few rods and let the sky pay you.
The battery pack is the sneaky gate here. You can have a stack of iridium bars ready to go and still get stuck waiting on a storm. So plonk down some Lightning Rods early and forget about them – future you will be grateful when a thunderstorm rolls in and hands you free batteries.
Once you’ve got all three, pop open the crafting menu, and there it is. Your first homemade purple sprinkler. It’s a quiet little milestone, but it matters. That’s the moment your mornings start belonging to you again.
Where to Buy or Find a Stardew Valley Iridium Sprinkler?
Not everyone wants to grind bars. Fair enough. If you’d rather throw gold at the problem, the Stardew Valley Iridium Sprinkler has a few other sources, and they’re worth knowing about.
The most reliable shortcut is Krobus, the friendly shadow shopkeeper hiding in the Sewers. He sells exactly one iridium sprinkler every Friday for 10,000g. One per week, no more. So if you’re in a hurry, swing by his shop each Friday and grab whatever you can afford.
Beyond Krobus, a couple of one-to-two iridium sprinklers can turn up in treasure rooms inside the Skull Cavern. They’re not guaranteed, but if you’re already farming iridium down there, finding a free sprinkler in a chest is a nice little bonus. There’s also a chance one pops out of Mayor Lewis’ Prize Machine if you cash in a Prize Ticket, which is a newer way to score one.
Quick gut check on Krobus, though. Ten grand for one sprinkler is steep. If you’ve got a steady iridium supply, crafting your own usually works out cheaper than buying – you’d spend less gathering the materials than handing Krobus that pile of cash week after week. The buy option is really for players who are swimming in gold but short on iridium. Pick whichever fits your run.
Farming Iridium Without Pulling Your Hair Out
Let’s be real – the only hard part of this whole thing is the iridium. Everything else is a walk in the park. So how do you get a steady stream of it without losing entire afternoons?
The Skull Cavern is your main hunting ground, and the deeper you go, the more iridium ore you’ll spot. Floor 100 and beyond is where it really starts flowing. The catch is that the cavern is brutal, monsters hit hard, and the clock is always ticking. You need a plan.
Here’s how seasoned players speedrun their iridium runs:
- Pack bombs, lots of them. Mega Bombs blow open clusters of rocks in one go, saving you from swinging a pickaxe a hundred times. Bring a stack and clear floors quick.
- Eat for luck and speed. Spicy Eel gives you luck and speed at once, which means more ore and faster legs. High-luck days (check the TV fortune teller) are the ones to save your runs for.
- Craft Staircases. A pocketful of staircases lets you skip nasty floors and plunge toward the deep ore-rich levels fast. Burn through the boring early floors and get to the good stuff.
- Grab the Statue of Perfection. Earn a four-candle rating in Grandpa’s evaluation and you get this statue, which spits out free iridium ore every single day. Set-it-and-forget-it iridium.
That statue is the real long game. Once it’s chugging out ore daily, you stop sweating the Skull Cavern so much, and crafting iridium sprinklers becomes an afterthought instead of a project. Until then, lean on bombs and lucky days, and you’ll be fine.
One more tip people forget: smelting takes time. An iridium bar needs 8 hours in the furnace. So queue up your bars before bed or before a long fishing session, and they’ll be ready when you swing back around. Don’t just stand there watching the furnace – that’s wasted daylight.
Laying Out Your Field So Nothing Goes Thirsty
Okay, you’ve got a few sprinklers. Now where do they go? This is where a little planning saves you a ton of headaches, because a sloppy layout means dry tiles and dead crops.
The iridium sprinkler’s coverage is a clean 5×5 grid centered on the sprinkler, minus the four corners. So picture the sprinkler in the middle, two tiles of reach in every direction. The trick for big open fields is spacing them five tiles apart, center to center. Do that, and the squares line up edge to edge with no gaps and no wasted overlap. Tidy rows, fully watered, zero fuss.
Overlap is the rookie trap. If you crowd your sprinklers too close, their coverage zones pile on top of each other, and you’ve basically paid iridium prices to water the same dirt twice. Spread them out. Give each one its own 5×5 block of soil and let it do its job.
The greenhouse is its own special case, and it’s where iridium sprinklers really shine. The interior is small and rectangular, so a couple of well-placed sprinklers handle nearly the whole thing. You lose a tile or two to the sprinklers themselves, but everything else grows year-round. It’s the cozy heart of a late-game farm.
And here’s a gentle contradiction I’ll resolve in a second – I said earlier that overlap is bad, and it is. But there’s one exception. In the greenhouse, where every square is precious, a sliver of overlap is sometimes worth it just to make sure no tile gets left dry. Tiny farms reward precision over efficiency. So the rule is “avoid overlap on big fields, but don’t sweat a little of it in tight spaces.”
The Pressure Nozzle Trick Folks Sleep On
Here’s the upgrade that quietly doubles your coverage, and a surprising number of players never bother with it.
The Pressure Nozzle is an attachment you snap onto a placed sprinkler. It pushes the watering range out by one extra tile in every direction. For the iridium model, that turns the 5×5 area into a full 7×7 grid – 48 tiles from a single sprinkler. That’s twice the dirt, same purple square.
Take a look at how the nozzle changes each tier:
| Sprinkler | Normal Coverage | With Pressure Nozzle |
|---|---|---|
| Basic | 4 tiles | 8 tiles (3×3) |
| Quality | 8 tiles (3×3) | 24 tiles (5×5) |
| Iridium | 24 tiles (5×5) | 48 tiles (7×7) |
Wild, right? A nozzled iridium sprinkler covers as much ground as two bare ones. In the greenhouse, this is the play – fit your sprinklers with nozzles and you can water nearly the entire interior, giving up only the squares the sprinklers sit on. Maximum crops, minimum hardware.
So where do you get these little wonders? They live in Qi’s Walnut Room on Ginger Island, and that’s the wrinkle. You have to reach the island and collect 100 Golden Walnuts to get into the room at all. Once you’re in, Pressure Nozzles cost 20 Qi Gems for a set of four, which you earn by knocking out Mr. Qi’s special quests.
That’s a serious late-game ask, no sugarcoating it. Plenty of players never see Qi’s room. But if you’re deep into a run and chasing that perfect automated farm, the nozzle is the cherry on top. They also drop rarely from Skull Cavern monsters during certain Qi challenge quests, so keep an eye out down there.
Enricher or Pressure Nozzle? Pick Your Fighter
While you’re in Qi’s room eyeing nozzles, you’ll spot a second attachment called the Enricher, and it costs the same 20 Qi Gems for four. Here’s the rub – a sprinkler can only wear one attachment at a time. So you’ve got a real decision on your hands.
The Pressure Nozzle, as we covered, stretches your watering range. The Enricher does something totally different: load it up with fertilizer like a little chest, and it automatically applies that fertilizer to nearby tilled soil whenever you plant seeds. For the chronically forgetful among us – and you know who you are – that’s a quiet lifesaver. No more silver-star crops because you spaced on the Deluxe Speed-Gro.
So which one wins? It depends on your goals.
If you’re hunting for the biggest possible coverage with the fewest sprinklers, go nozzle. If you’re tired of manually fertilizing every season and you’d rather automate the boring stuff, go Enricher. Lots of players mix both across different parts of the farm – nozzles in the open fields for reach, Enrichers in the patches where crop quality matters most. Since they’re cheap once you’re earning Qi Gems, you don’t have to commit to just one. Grab both and split them up.
Rookie Mistakes That’ll Cost You a Harvest
Even folks who’ve logged a hundred hours fumble their sprinkler setups. Here are the slip-ups worth dodging:
- Forgetting to till every tile. Sprinklers only water tilled ground. Leave a patch un-hoed and those crops die thirsty, even if they’re sitting right inside the coverage zone.
- Crowding sprinklers together. Overlapping coverage on a big field just wastes iridium. Space them five tiles apart and let each one breathe.
- Trying to water Garden Pots. No sprinkler can water a Garden Pot or your pet’s bowl. If you forget, your indoor pots dry out and you’ll wonder why.
- Crafting too early without an iridium pipeline. Building one sprinkler is cute, but you need a steady ore supply to outfit a whole farm. Sort out your Skull Cavern routine first, then mass-produce.
- Planting on sand. Beach farm players, the sprinkler won’t sit on sandy tiles at all. Plan your soil patches around that limitation.
Most of these come down to one habit – plan the layout before you plant, not after. Sketch your rows, mark where each sprinkler goes, then hoe and seed around it. Five minutes of planning saves you a whole sad, dehydrated harvest.
So, Is It Actually Worth It?
Short answer? Absolutely, yes. Once you’ve got a reliable iridium source, outfitting your farm with these sprinklers is the single best thing you can do for your daily routine.
Think about what manual watering actually costs you. A 70-ish tile field eats most of your morning and a big chunk of your energy bar. That’s energy you could’ve spent in the Skull Cavern pulling more iridium, or chatting up the villager you’re trying to romance, or filling kegs with the good stuff. Sprinklers hand all that time back.
The payback math is friendly, too. A single sprinkler runs you roughly 2,000g worth of materials and covers 24 tiles. Plant something juicy like Blueberries or Ancient Fruit in that block, and the harvest covers the sprinkler’s cost on the very first picking. After that, it’s pure profit for the rest of the season – and the season after that, and the one after that. These things don’t wear out.
There’s a catch, sure. The upfront iridium grind is real, and the Pressure Nozzle sits behind a hefty Ginger Island wall. But none of that changes the verdict. The Stardew Valley Iridium Sprinkler is the backbone of every serious farm, and once it clicks into place, you’ll never want to go back to the watering can. Nobody does.
FAQ
What farming level do I need for the iridium sprinkler?
You earn the crafting recipe at Farming level 9. Before that, you can still buy or find one, but crafting is the dependable route.
Can I buy one instead of crafting it?
Yep. Krobus sells a single iridium sprinkler every Friday for 10,000g down in the Sewers. Just one per week, though.
How many tiles does it actually water?
Twenty-four, arranged in a 5×5 square with the four corners left out. Only tilled soil gets watered.
Does it water Garden Pots or my pet’s bowl?
Nope. No sprinkler can water Garden Pots or the pet’s water bowl, so plan to handle those by hand.
What does the Pressure Nozzle do for it?
It stretches the coverage from 5×5 up to a 7×7 grid, so a single sprinkler waters 48 tiles instead of 24. Great for the greenhouse.
Can I place it on the beach farm sand?
Not on sand tiles. Sprinklers refuse to sit there, so build your soil patches on regular ground.
Is it worth crafting early in the game?
Once you’ve got a steady iridium supply, definitely. Early on, the ore grind can slow you down, so bridge with quality sprinklers until your Skull Cavern runs are smooth.
Wrapping Up
The watering can served its purpose. It taught you the grind, made you sweat over a row of parsnips, and gave you a reason to cheer the day you finally crafted something better.
That something better is the iridium sprinkler. Twenty-four tiles a morning, no energy spent, and your whole day freed up for mining, fishing, or just wandering into town to flirt with whoever caught your eye. Slap a Pressure Nozzle on it and you’re watering nearly half a hundred tiles per square.
So get your farming to level 9, sort out a steady stream of iridium, and start dropping these purple beauties across your fields. Your future self – the one sipping coffee while the crops water themselves – will thank you.
P.S. Show your unwavering support for our team by broadcasting this post across your social media channels and adding this content to your bookmarks. Every share and saved link helps amplify our voice while keeping our latest updates right at your fingertips. Should you wish to explore a creative or commercial collaboration, please write to the Lizet Manski team directly to start the conversation.